
The MSB-RS485 analyzers are used to find errors in the high level protocol of the data stream or in the low level protocol of the field bus transmission.
The following document shall help you to find out asynchronous transmission errors, flagged as framing errors, with the help of the signal view. Its display of the logical values has some advantages over the display of the analogous signal of a digital scope.
While the analyzer decodes what the bus devices decode, the scope only sees the data lines. It is sometimes hard to decide from the scope function which logical data is just being decoded, especially at the signal edges.
Additionally the analyzer has the unique feature to indicate the inactive bus state which has great advantages over other analyzing methods.
General hints
In this document we show how to search for asynchronous transmission errors on bus level, even if the analyzer is no digital scope.
Most important hints are printed in cursive.
The document extends the search for „Standard transmission errors“, which is described in article
Examine Standard transmission errors or as PDF. So please read this document first.
It is self-evident that the settings are correct so that framing and parity errors, caused by wrong protocol settings can be excluded. For this purpose you can use the protocol scanner to detect the bit rate, data bits and parity of the transmission.
Always use the latest analyzer software: Download Center
In addition you need some knowledge about RS485 and the bus design. Some hints are described in:
RS485 Facts and bus or as a PDF
If you are not interested in the background information for the error detection simply jump to the last chapter „Error research summary“ and follow the steps with cross-references to other chapters.
Now let‘s start to examine the bus conditions in correct frames and put the critical phases together to get a clue where to search if unknown errors occur.
Our bus is a two wire bus where the bus is undriven (released, floating, inactive) when no sender is just active. The bus is tapped in the two wire mode, the segment mode is not recommended because it might not work correctly when errors are on the bus lines.
Correct transmission
At first we take a look at a correct data transmission and transfer the single example byte 23h in 8N1 asynchronous protocol. The drawing shows different views a) to d).
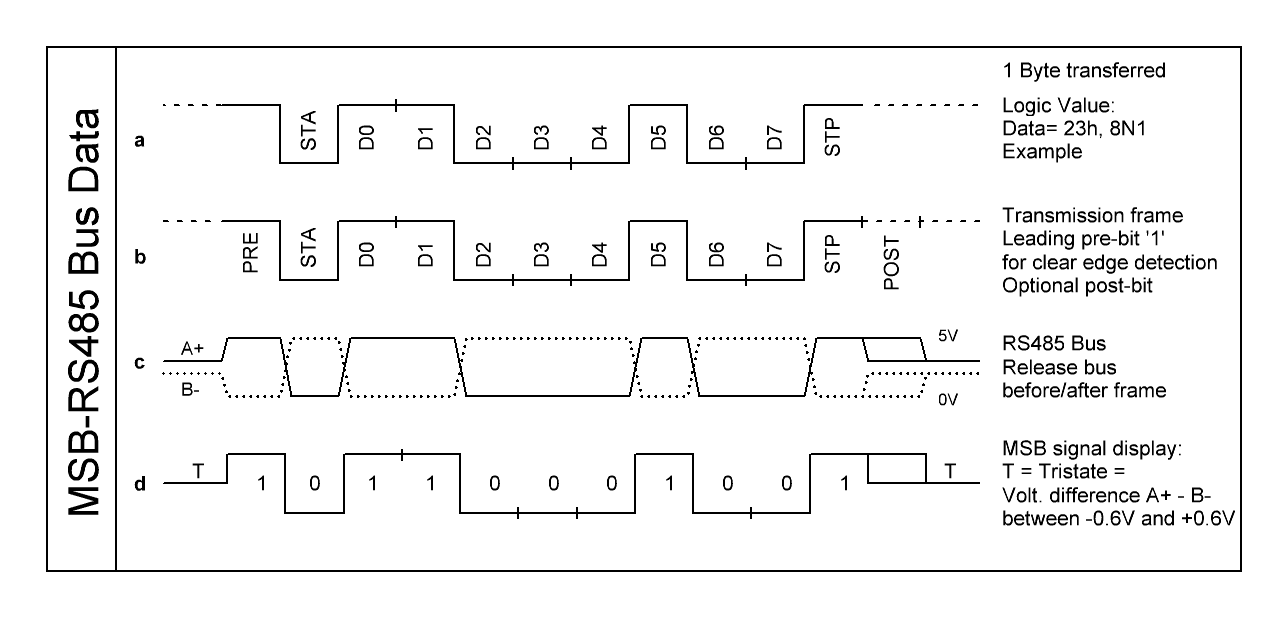
Picture 1: MSB-RS485 Bus data
1a) The original bits with one leading start bit and a closing stop bit. The first negative edge of the start bit is always the start of the character frame and synchronizes the bit sampling. The stop bit is always ’1’ to return to the idle state, independent of the bit before.
1b) Pre-bit. Before the negative start edge the bus should be active idle ’1’. This is achieved by at least one optional ’1’ pre-bit which mostly is the stop bit of the last transferred character in a multi-byte transmission.
After the last stop bit the time of one additional post-bit can (should) be used to disable the sender.
1c) The real signals on the bus. Both data lines A+ and B- are complementary. To release the bus before and after the transmission the sender is disabled and a network of resistors sets the floating bus to a difference rest level (A+ - B-) of +200mV at 2.5V absolute bus voltage.
The attached receivers interpret a positive difference level (even 0V) as an idle level with bit value ‚1‘.
1d) Analyzer display. This is what the analyzer shows. The rest level is detected and shown as a line in the middle of the signal. This is an important feature to distinguish between a ‘real’ idle bit and the idle rest state which is also seen as ’1’.
Basic connection faults
From the picture with the correct signal we can gather the following basic rules:
- The signal must start with a negative edge, starting from the active or inactive bus condition. A pre-bit does not always exist.
- The transmission must end with a transition from active ‚1‘ to inactive. An additional post-bit is not always available.
- The bus bits must not have dips.
- There must not be longer conditions with inactive bus within a transmitted character. Short inactive phases while bit changing may occur.
- The inactive bus is seen as logical ‚1‘ by the receivers.
That seems to be self-evident but helps to find basic errors. The following picture gives some hints where to look at the scopes to see irregularities.
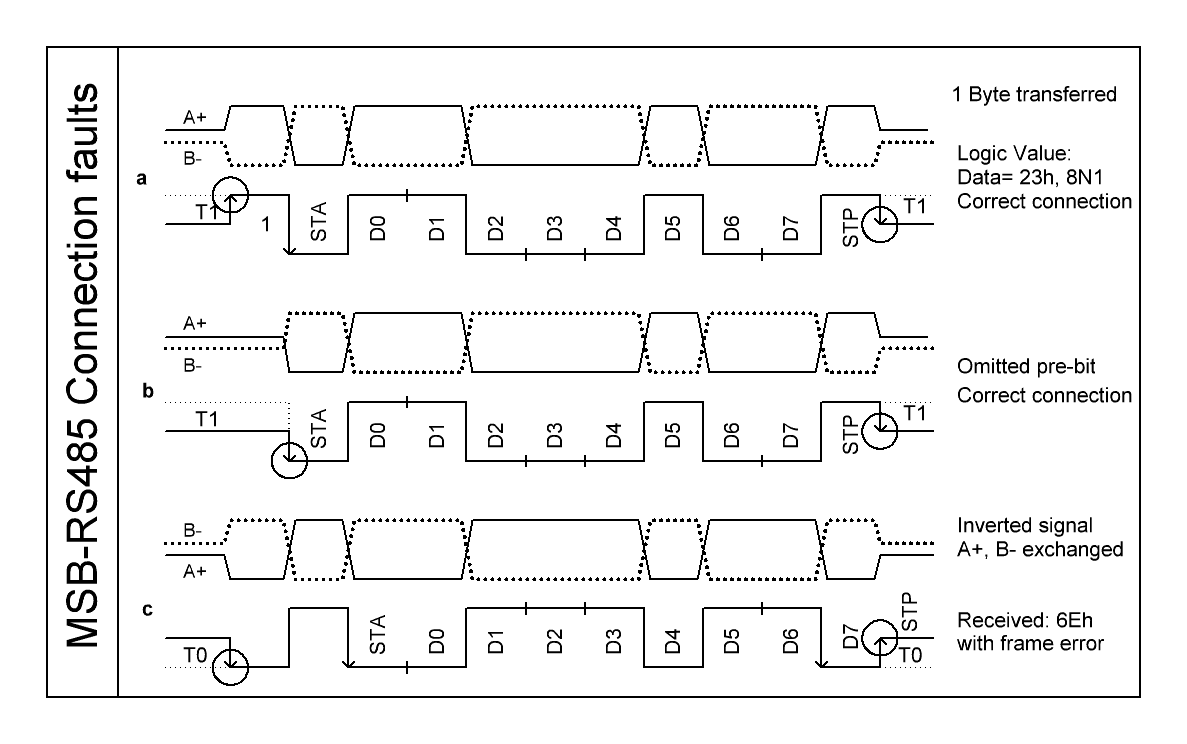
Picture 2: MSB-RS485 Connection faults
2a) Correct signal with a leading pre-bit. The signal has a postive edge from the inactive state. The last edge is correct negative.
2b) Omitted pre-bit. An also (bit less) correct signal with no pre-bit. The first edge is the negative start edge. The last edge is correct negative.
2c) A+ and B- interchanged. The signal is correct with a pre-bit. In this case the positive edge from the inactive state is not recognized because the floating state is seen as inverse ‚1‘, means ‚0‘. The logical state does not alter.
So the next positive edge after the start bit is now seen as the negative start edge. The following bit decoding leads to an incorrect character. The last edge is wrong positive.
The result is that you can not rely on the first data edge. To be sure that the wires are correctly connected and not interchanged you have to take a look at the last edge of the transmission. It has to be a negative edge to the inactive state.
Extended rest level detection
Before going on it is time to describe a unique feature of the analyzer. It is the rest level detection, which applies when no bus device is just sending. In this case the bus is inactive and should be set to a rest level of +200mV through an external resistor network.
A standard receiver sees this level as a logic ‚1‘, it does not know if this is a real bit or if it is an idle rest level with an undriven bus.
This detection can not be provided by pure software solutions, a dedicated analyzing hardware is necessary, a real advantage of the MSB.
To achieve this detection all input channels have an additional voltage window comparator. The voltage difference (swing) from A+ to B- between around -600mV and +600mV (average values) is seen as the inactive bus level.
By setting the comparator trigger levels to the higher voltage of about 0.6V than the 200mV recommended rest level additional bus states and errors can be detected, see picture 3a)-3f)
- Bus release (disable). In this condition the bus should be set to +200mV through external resistors (3a).
- Incorrect bus termination with a rest level above about 600mV (3b).
- Active voltage swings which are too low for a reliable transmission. RS485 recommends ±2V. ±1V is still working but ±500mV is not reliable (3c).
- Overshooting peeks when bits are changed and damped voltage swing (3d).
- Short sporadic disturbances (3e).
- Slow bus drivers where the signal edges stay a longer time in the rest level detection range (3f).
- Bus disable and enable times for every device
- Omitted pre and post bit.
- General bus activity detection.
- Voltage collapse caused by high bus load or short circuits.
- Detection of the data direction on the bus with the help of the analyzer’s segment mode feature.
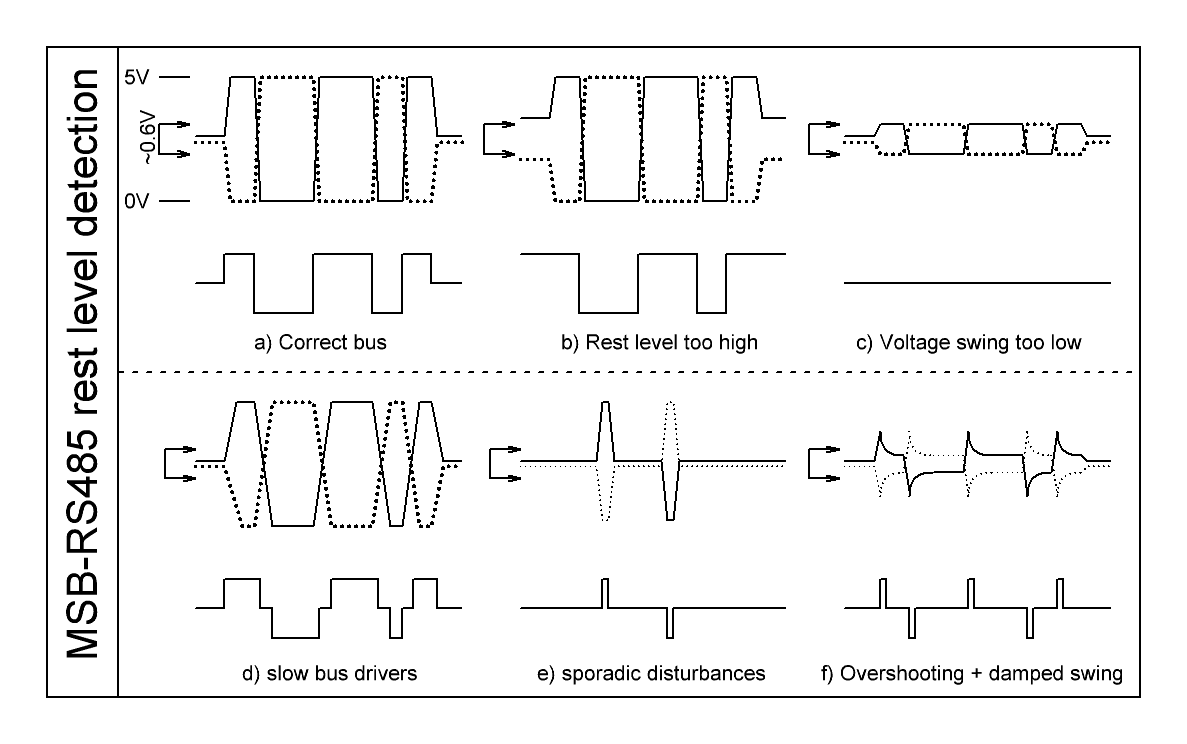
Picture 3: MSB-RS485 rest level detection
The following chapters show how to use this feature to find a relationship between the occurring errors on the wires and the signal view of the analyzer.
Bus integrity
The main source for transmission trouble is bad bus quality and termination. Of course the analyzer can not detect all physical issues on the line but can give a lot of hints.
The following displayed signals indicate problems on the bus and must be checked first because they will not necessarily generate framing errors, see picture 3b)-3d)
- Bus rest voltage too high
- Bus voltage swing generally too low
- Slow bus drivers.
No inactive state. The inactive bus is not detected. Three reasons are possible. Either the bus is not a RS485 multi-point bus where the drivers are released after sending. Or the bus is not correctly adjusted through termination resistors or a defective or incorrectly set bus device keeps the level high (3b).
In this case possibly no framing error is issued. The segment mode will not work.
Permanent inactive state. With correctly received data and correctly enabled signal recording we see … nothing. The signal stays in the middle of the display indicating that the voltage swing in both directions is always below the trigger level of the rest level detection.
The bus voltage is below the reliable level (3c)
Slow bit edges. While changing the bit value the bus stays in the detection level window for longer than the normal transition time (3d).
The slow edges delay the detection of the bits and delay the bit sampling points since the negative (delayed) start edge is used to synchronize the sampling mechanism.
The edges should be less than 1/10 of the bit rate.
If this behavior is general for nearly all devices the bus may have too much load, repeaters should be used.
If only a single device is concerned this one might be not appropriate for driving the bus, because the drivers are too weak or too slow. The specified driver bit rate should be higher than the used bit rate, a factor of two is great.
Check the bus for these basic issues, even if no framing errors are detected.
Analyzer error checking
The analyzer checks the lines and transmitted data for the following errors and issues a „framing error“ at the end of the received character. The character is flagged with „F“ in the data and event windows:
- Start bit is not ‚0‘ at the sampling point
- Stop bit is not ‚1‘ at the sampling point
- Logic level changes within a bit
- Voltage dips from active to inactive within a bit.
- In general unstable bits ±¼ Bit around the sampling point at ½ bit time.
Spikes and dips on the lines
We now come to the „real“ errors. A selection can be seen in picture 3d and 3e.
In general you see strange spikes or dips on the line were you would like to see plain bits or an inactive bus.
The analyzer will indicate a framing error due to the faults listed in chapter „Error checking“.
Repeated spikes. This is like the complete inactive line but you can see more or less wide spikes up and/or down which can be assigned to a bit raster (3e).
The reason is that at the bit edges the RS485 lines have an overshooting transient behavior which pass the detection limits for a short time before the voltage swing is damped below the detection level.
These spikes might occur at every bit edge or only at some edges, up and/or down in a manifold pattern. If the spikes occur in one direction only it might be a sign that the bus is unsymmetrical. This can be checked with an external scope.
In some applications this behavior can be assigned to a certain device which does not have enough power to source the complete bus or has weak bus drivers. Also 3.3V devices have a disadvantage compared to 5V devices.
If it concerns more devices the bus load might be too high, too many devices at the bus or the bus has a wrong termination with a too low resistance. Consider bus repeaters, check the bus parameters.
Sporadic spikes. If the spikes occur in irregular intervals they are caused by disturbances from the environment (3f).
These single peeks or glitches can produce a dummy (phantom) character, mostly FFh. This is evoked by the negative edge of the spike which is seen as the start edge. If the spike is shorter than half a bit the start bit is not ‚0‘ when sampled and therefore a framing error is produced.
Often they are caused by power lines which are running near the bus lines. If motors are powered on and off disturbances are induced into the bus lines if they are not correctly shielded.
To find the cause for the disturbance the event monitor of the analyzer can be a help. Check the time stamps of the peeks and see if you can assign them to certain events in the environment, e.g. the mentioned motor. Perhaps the external devices are switched in known intervals.
For these error patterns you should use an external scope for a detailed examination.
External Scope
The analyzer can give a lot of hints for transmission problems but it does not include a complete digital scope. So for a detailed bus examination an external scope is necessary. For a first bus check attach the digital Scope channels A and B to A+ and B-.
Do the following checks while data is transmitted:
- Is the difference between A+ and B- (swing) in the inactive state about +200mV, not less, maybe slightly more.
- Is the middle of the bus in the inactive state at about 2.5V.
- Is the voltage swing in the active phases more than ±2V, better ±3 to ±4.5V as far as you can capture it.
- Do the bit edges have high overshooting spikes.
- Is the swing generally symmetric.
For these checks you do not need an external trigger.
If you have a multimeter also check the resistance between the data lines. With correct termination at the bus ends with 120Ω it must read 60Ω.
We strongly recommend that the ground line is connected to all bus devices to avoid equalizing currents flowing through the data lines. Take a look at your bus structure.
For the active examination of the errors, indicated by the analyzer, you need the external trigger function of the scope. In case you have only a two channel scope you can use channel B as the trigger while A stays attached to A+ of the bus. Since B- is the complementary signal to A+ it can be omitted.
Connect the external trigger to the IO Pin of one of the two analyzer ports. Connect ground. Set the scope trigger to a level of around 2.5V.
Enter the analyzer settings menu, select connection. In the settings for the auxiliary IO ports (1 or 2) select „Error Output“. In this case a positive pulse of 1 bit width at the end of the concerned character is issued whenever a transmission error (framing, parity, break) occurs.
That means that the trigger and time base of the scope must be set so, that a complete byte frame can be seen ahead of the trigger event (pre-trigger).
Errors pulses are issued for both serial data channels A and B. If you want to limit it to A or B you can set the bit rate source in the scanner menu. This setting is also used to select the source for the error output.
If you want to see the same error in the external scope and the analyzer signal view (if several errors occur) you can do the following:
Stop logging, Re-trigger the scope, Start logging.
In this case the first issued pulse will trigger the scope. Search for the first occurring error in the analyzer. This one will correspond to the captured scope picture.
With the help of the protocol window you can assign the character to a certain device, see the next chapter.
After capturing an error you can try to assign it to special circumstances.
Shift through the error list
If a bus error occurs it mostly has influence on the received character. If an error, perhaps a glitch, destroys a single bit a framing or parity (if enabled) error will be decoded as mentioned later.
The event monitor is the right place for searching for errors. These are the steps to find the errors one after another in the log file:
- Open the event monitor.
- Open the search dialog.
- Enter: OR: A=frame A=parity B=frame B=parity for both channels. If you only search for framing A enter A=frame
- Open the signal view and the data monitor. Click on the synchronize button each (arrow to the left).
- If you use the protocol view you can also synchronize it to the event monitor. In this case the protocol monitor can show you which device is affected. But be cautious. The protocol decoding might not work correctly when errors in the received characters occur.
- Back to the event monitor click on „search“ and you will be beamed to the next occurred error.
- As soon as you jump to the next error the data dump and the signal view follow.
- Zoom into the signal view so that you can see the character preceding the flagged error which comes in the middle of the stop bit.
Error research summary
After capturing an error it is time to ask why it occurred and how to get rid of this kind of malfunction.
Of course we can only give hints, the error sources are diverse and often depending on the complete bus structure.
From all the above error patterns and hints we recommend the following procedure when transmission errors occur:
- Check the protocol settings (data bits, parity, bit rate). If possible use a parity bit in your bus settings.
- Check the bus integrity, means that the bus is not permanent active. See 4b).
- Check for correct connection, no exchanged wires. See chapter „Basic connection faults“ and picture 4c).
- Check for slow bus drivers. See chapter „Bus integrity“. See picture 4d)
- Make sure that the basic bus structure and termination is correct as explained in chapter „External scope“. Use a ground line and sufficient shielding.
- See if spikes and/or dips are shown like in the respective chapter. Try to figure out if these events are in a bit raster or not. See chapter „Spikes and dips“.
- If the spikes are not in a raster they are influences from the environment, often induced by heavy currents from nearby cables. See picture 4e). A trick to find the source is to check the time stamps in the event window. Perhaps you can find a period or can synchronize the events to other events in the system like power on/off of motors.
- If the events are in a bit raster check if they are produced by one device or a group of devices. Check the voltage swing, the bit edge slope. In general if this device is suitable for this bus and has a stable power supply and bus connection. See picture 4f) to 4k)
- For a more detailed bus examination you need an external scope which can be synchronized to the detected error. Use the analyzer IO pin for this purpose, see chapter „External Scope“
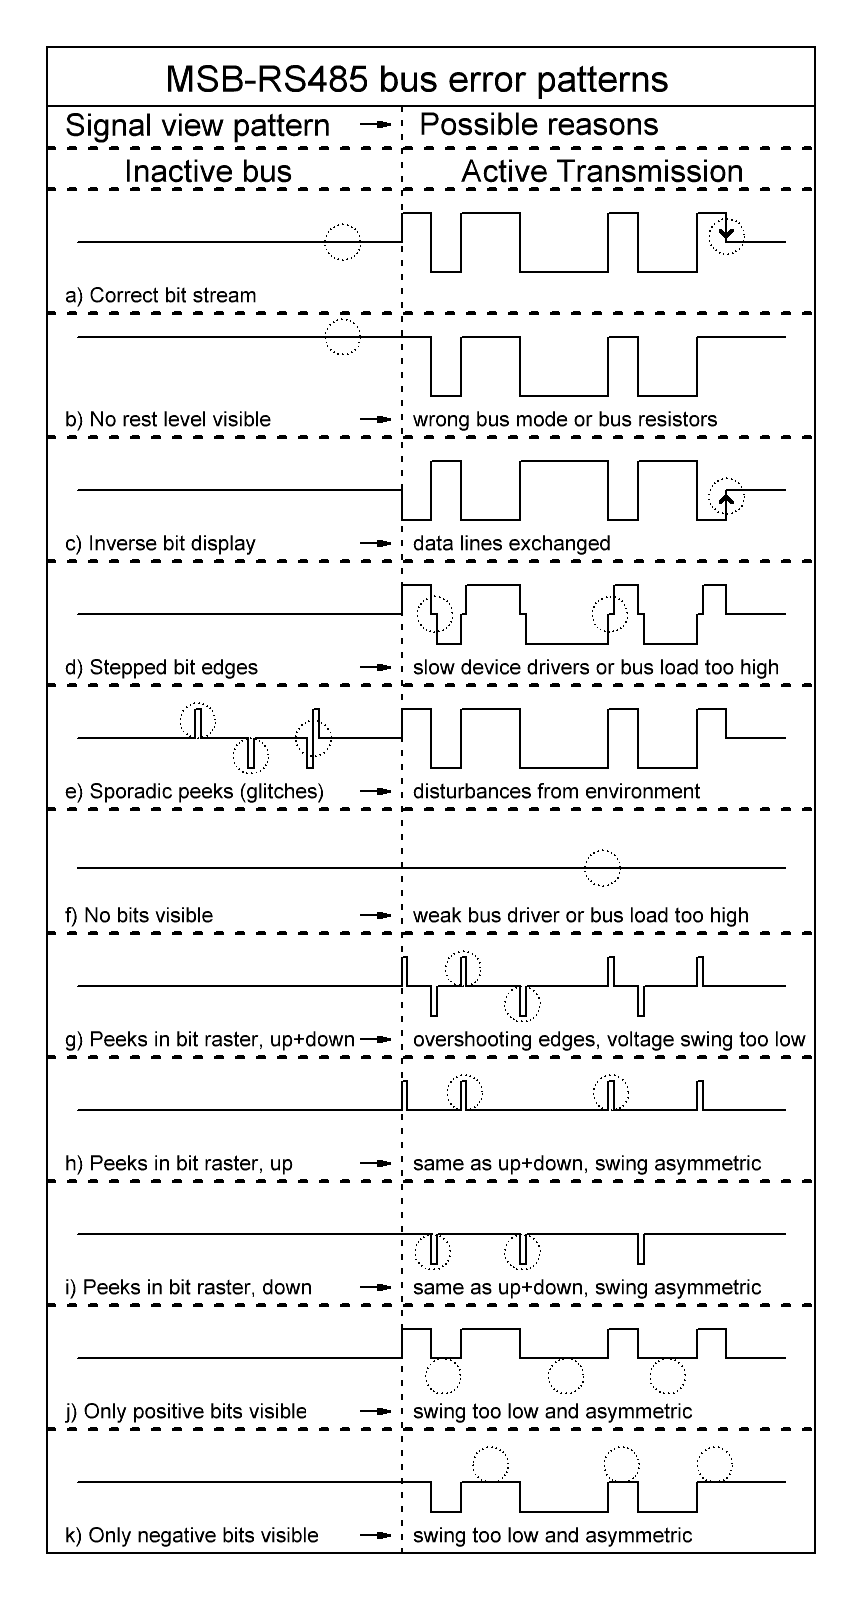 Picture 4: MSB-RS485 Bus error pattern
RS485 bus error detection as PDF